Implementing Game Juice in a Simple Puzzle Game
Nov 30, 2025 (updated: 4 months ago)
Making the L-Game Less Boring with "Game Juice"
I'm a math enthusiast. I love game theory and combinatorial games. The L-game is a perfect example of this. However, the game is quite boring if you just implement it exactly as described. Why don't we add a little "juice" to make it more engaging?
What is Game Juice?
Before diving into the implementation, I have to give a huge shout-out to Mark Brown's Video here,
It was the first resource that really made me aware of these concepts.
In game design, "Game Feel" or "Juice" refers to the elusive quality that makes a game feel alive and responsive. It's the difference between a game that feels "limp and lifeless" and one that "pops and crackles" with energy.
I am by no means an expert in game design; I'm just a mere game enthusiast applying some of these techniques to make a static board game feel more tactile. For this project, I focused on doubling down on the game's fundamental actions to ensure every move provides satisfying feedback to the player.
What is the L-Game?
The L-game is played on a tiny grid. Each player has one L-shaped piece, and there are two neutral pieces.
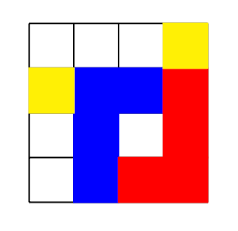
On your turn, you must move your L-piece to a new empty position. You then have the option to move one of the neutral pieces to any empty square. The goal is to trap your opponent so they can't move their L-piece. It is a game of pure spatial logic with zero luck.
Pixel Art Choice
I personally picked a retro aesthetic because it fits the "limitation" theme of the game. When you only have a grid, a low-resolution style feels natural. To create good pixel artwork, there are a few things you should consider so the result doesn't look crappy (I'll be making a more detailed post about these rules in the future):
- Color Palette: A tight, limited palette keeps the visual style cohesive.
- Size Consistency: Avoid mixing pixel scales. "Fake" pixel artists often mix resolutions, which breaks the consistency of the art.
- Line Art: Respecting pixel-specific line rules is vital. You should watch out for doubles, jaggies, and maintain perfect angles to keep the shapes clean (you can find a good explanation of these terms here).
Visual Juice
Visual juice focuses on making every interaction on the screen feel reactive and satisfying. In a logic-heavy game like this, these effects provide the player with clear, instantaneous feed back for every move they make.
Isometric as Fake Depth
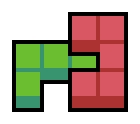
The first visual trick I used creating a sense of height and weight. Most implementations I found online are very flat, with pieces that look like simple colored tiles. To fix this, I used isometric perspective to create fake depth cheaply.
By shifting the perspectively slightly and adding a "side" to the sprites offset by a few pixels, the pieces appear as 3D objects sitting on the board rather than being part of the background.
Because of the depth addition, there is a problem with the drawing order. We have to draw the pieces in a proper order, otherwise the visual would be weird.
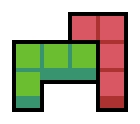
Because the shape of the pieces is good enough to not fall into a cyclic overlapping problem. The order of the drawing can be calculated using the Painter's Algorithm or simply drawing by the increasing coordinates.
"The Painter's algorithm is basically used to paint the polygons in the view plane by considering their distance from the viewer. The polygons which are at more distance from the viewer are painted first."
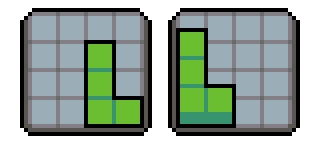
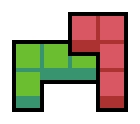
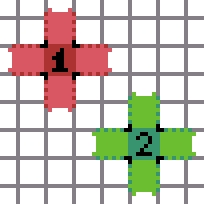
The Cyclic Overlapping Problem is a classic case the Painter’s Algorithm cannot solve without splitting polygons. It happens when there exists a cyclic dependency of object drawing orders.
The painter's algorithm cannot solve these two pieces because both pieces depend on each other.
Proof
nerd alert, you can skip this section 🤓☝️
The L-shape piece is a specific shape of a generic shape which is solvable using the Painter's Algorithm. I'm going to prove the solution for such shape and apply to the L-shape.
Let and be two cells on the grid for some . The dependency relation between and can be determined as follows:
Note that there are and with no dependency and it means and can be drawn in whatever order.
Let is a set of all sets of adjacent cells and . The priority relation between and can be determined as follow:
In other words, has priority over if there is no overlapping cell and no cell in is behind any cell in .
If for and there is no relation between and , e.g. and , and is in a cyclic dependency.
Let
for some and . These are shapes that expand vertically and horizontally from their center and the L-piece is a special case of this shape.
Given , we want to prove that for any valid and with , either or and
This is the condition we want to apply the Painter's Algorithm. To apply the algorithm, we examine the 9 possible cases resulting from the comparison of and coordinates , , and . While enumerating every case is tedious, the condition, the condition ensures that growth along each axis is constrained.This prevents cyclic dependencies, particularly in the cases where and . Eventually, we will have the condition.
Layers of UX Juice
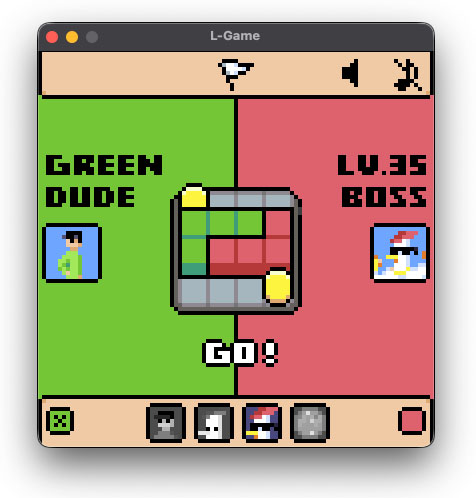
To make the L-Game feel alive rather than a static grid, I implemented a layered feedback system that triggers in a specific sequence.
Background
The First layer of communication is the screen itself. The large green and red diagonal backgrounds act as a "macro-state" indicator, instantly telling the player who is currently in control without them needing to read a single word.

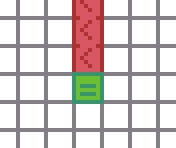
Cell Dropping
When a piece is being placed or drawn, I use a "drop-in" effect. Instead of just appearing, pieces descend from a slight vertical offset, which emphasizes the isometric depth and makes the board feel like it's being built in real-time.
Here is the initial values for a cell in GameMaker Studio 2
delay = 1; // delay time for each calculation
height = 10; // the offset starting with
progress = 0; // the progress of being place
growth_rate = 0.1; // the growing rate for each step
is_placing = true; // the boolean value to check if the cell is placing or lifting
alarm[0] = delay; // starts the animation
To draw the cell as intended we have to use draw_sprite_ext to draw it with an offset
draw_sprite_ext(
  sprite_index, 0,
  x, y - height * (1 - progress),
  1, 1, 0, c_white, progress
);
The calculation loop using alarm[0]
if (is_placing) {
  progress += growth_rate;
  if (progress >= 1) progress = 1;
  else alarm[0] = delay;
}
else {
  progress -= growth_rate;
  if (progress <= 0) {
    if (global.TEMP_BOARD[index] == self)
      global.TEMP_BOARD[index] = pointer_null;
      instance_destroy();
    }
  else alarm[0] = delay;
}
If the cell is being placed, the progress increases and keep this alarm alive. Otherwise the block decreases the progress overtime and eventually destroy this cell.
Impact Feedback
To give the pieces weight, I added a bouncy feedback. When an L-piece lands, it undergoes a slight pop animation. This tactile response not only tells the player the move is locked in but also provides a satisfying "thud" for the eyes
The trick here is extremely easy, you can set the initial image_xscale and image_yscale of the piece slightly larger than 1 then reduce them to 1 over a short duration. Here is an example of a scr_place_piece function
function scr_place_piece(piece, column, row, index){
  // ... initial settings
  piece.image_xscale = 1.4;
  piece.image_yscale = 1.3;
  piece.visible = true;  // The piece was hidden during a turn
  // ..
}
and the draw loop of the piece
var spd = 0.05;

image_xscale += clamp(1 - image_xscale, -spd, spd);
image_yscale += clamp(1 - image_yscale, -spd, spd);
draw_self();
Let's break down the draw loop:
clamp(val, min, max)is a built-in function to keep the valuevalin a specific range [min,max] (inclusive).1 - image_?scaleis the distance fromimage_?scaleto1. If we cap this distance to the speed of changespdby limiting the distance in range [-spd,spd], we have a velocity of change to1.
This approach creates a linear easing, which I find feels the most consistent. However, you can get creative by smoothing the scaling transition even further using: image_xscale += (1 - image_xscale) * smoothness; where smoothness is a small decimal, such as 0.5. Or giving the initial values differently, such as setting image_xscale to 1.2 while dropping image_yscale to 0.8; this forces the object to maintain its volume according to the traditional "Squash and Stretch" principle, making the impact feel fleshy.
Coin Jump
Finally, for the neutral pieces, I moved away from linear "teleporting". Coins now travel in a smooth arc. This parabolic motion makes the coins feel lighter than the L-pieces, adding variety to the physical "feel" of different objects on the board.
You may ask "how to calculate such parabola?" It's much simpler than you think. In an isometric perspective, the height of any point in a vertical parabola is deterministic. If we normalize the action throwing the coin as progress, we have 0% at the starting point and 100% at the ending point. We also know that the parabola will reach its highest point at 50%. We can formalize this as follow.
Let be a function determining the position on the parabola with a progress and its highest point . We have
Then we have these equations
Therefore,
Let be the starting point and the ending point on our screen respectively. We can calculate the projection of the flying coin at and its height with for a real progression . Therefore, the on screen location of the coin is
I also added another trick to smoothen the jumping using a particle system. It spawns fading coins while moving to create a smooth movement.
Audio Juice
Even with the drop-in effects and parabolic arcs working well, the experience still feels a bit incomplete. The true missing piece is the sound. To leverage the game feel even further, I applied specific audio effects to ground these movements in reality.
Sound Effects
Now, when a piece lands and triggers that squeeze and squash animation, it’s paired with a snappy click that gives the impact a sense of physical weight. When a coin performs its jump, a light hop sound reinforces that it’s a lighter, more neutral object compared to the solid cells. Adding these sounds bridges the gap between seeing an action and actually feeling it; it turns a smooth visual transition into a tactile event, making the board interactions feel much more "crunchy" and responsive.
Background music
With the "crunchy" audio juice in place, the final layer of the atmosphere comes down to the background music. The easiest way to get started is to find a solid loop, or even better, create one! I used Beepbox.co to quickly scratch out a chiptune melody - it’s a fantastic tool for generating that retro vibe with minimal effort.
However, I wanted to go beyond just a static track. If you’ve played Portal 2, you might have noticed how the music dynamically bends and shifts when you step onto a propulsion gel or enter an excursion funnel. That is Adaptive Music in action.
While I didn't have the time to compose several complex layers that cross-fade perfectly, I used a simpler trick to achieve a similar result: Stems. By separating the melody from the drums, I can control the energy of the room based on player behavior:
- The Thinking Phase: When a player is staring at the board and hasn't made a move, I lower the volume of the drums (the kicks and snares). This creates a "clearer" headspace so the percussion doesn't become a distraction while they calculate their next move.
- The Action Phase: As soon as the pieces start moving, the drums kick back in, driving the momentum and rewarding the player's decision with a boost in energy.
Here are the melody and the drums (don't judge me if it's bad, I'm not a musician ٩(。•́‿•̀。)۶). You can try to hit the Sync Time to snap them together.
Try to lower the drums' volume to see what happens during the thinking phase.
This piece is later remade into this one.
So..., that's a low-effort, high-impact way to make the music feel responsive to the player's brainpower without needing a full orchestral band.
Behavior Design
Enemy behavior is a critical part of game design. An Ai is not just something for player to "play against" - it's a psychological tool. A perfectly optimal AI that stomps the player every match isn't fun; it's demoralizing. Good behavior design focuses on playability, not raw intelligence.
For this game, I implemented two distict AI strategies to shape different emotional experiences. I jokingly named them Lv.1 Crook and Lv.35 Boss, but the difference between them is very intentional.

- The Lv.1 Crook uses a random-move strategy. Interestingly, a purely random AI can feel intelligent to players - it creates the illusion that the opponent "knows something," when in reality it doesn't. This works especially well in a difficult game like L-Game, where even bad moves can still look threatening.
- The Lv.35 Boss, on the other hand, uses a 2-depth minimax algorithm to minimize the player's next possible moveset. It's not deeply strategic, but it consistently applies pressure and punishes obvious mistakes, which makes it feel calculated and dangerous without being overwhelming.
A 2-depth (2-ply) minimax is a simple lookahead AI. The bot tries a move, then quickly simulates how the player could respond, and picks the option that leaves the player with the fewest good choices.
To reinforce the feeling difference, I also tuned reaction timing:
- The Lv.1 Crook has a noticeable thinking delay and often reacts slowly.
- The Lv.35 Boss responds much faster, creating a sense of urgency.
Combined with heavier sound effects, the faster response time creates a feeling of intimidation and pressure. The AI doesn't just play better - it feels more threatening.
Finale
Thank you for reading, that's all the techniques I have learned when creating this game. I hope you could apply some to your games. Stay tune!
(b ᵔ▽ᵔ)b
Also you want to try the game, you can try it below
Project link: L-Game

Table of contents
Join the discussion!

Nothing to preview yet. Start typing...