If you're a returning reader: The infrastructure described in this post has since moved - twice. The Contabo VPS and the
huuthang.sitedomain are both retired. If you're here for the original setup story, read on - but if you want to see where things stand today, jump straight to # On the Move Again.
This is the first in the series where I'll document my journey of moving my personal blog from a local machine to a public internet. The goal is to share my decisions, challenges, and solutions as I build out a reliable hosting stack.
I'm using a Svelte + Rust stack for my blog - almost overkill for a personal project, but it allows me to use any budget-friendly Virtual Private Server (VPS) options on the markets nowadays. This post focuses on the initial infrastructure setup, including VPS selection and server configuration.
The Hosting Server
I started by selecting a VPS provider that could support my stack while staying within budget. After evaluating several options, I chose Contabo (not sponsored). The VPS configuration includes:
| Resource | Spec |
|---|---|
| CPU | 4 vCPUs |
| RAM | 8GB |
| Storage | 200GB SSD |
| OS | Ubuntu 24.04.3 LTS |
After provisioning the VPS, I received access credentials via email. Contabo provided both password-based SSH access and VNC access, with the latter serving as a backup option for emergencies.
When conning via SSH, it's crucial to include the username in the command. For example:
ssh username@12.34.56.78Omitting the username will default to your local system's username, which will likely fail. Some pre-configured VPS templates also install fail2ban (like the one Contabo is using), which can ban your IP after a few failed login attempts. In such case, VNC becomes the only option unless you use a VPN to obtain a different public IP.
SSH (Secure Shell) is a secure way to connect to and control another computer over a network. It lets you log into a remote machine, run commands, transfer files, and manage servers over an encrypted connection, so passwords and data can’t be easily intercepted. SSH typically runs on port 22 and uses public-key cryptography or passwords for authentication.
VNC (Virtual Network Computing) is a remote access technology that lets you view and control another computer’s graphical desktop over a network, transmitting screen updates and mouse/keyboard input in real time, commonly used for remote support or managing machines when a full GUI is needed, as opposed to command-line - only tools like the SSH.
Domain Registration
With the VPS set up, I now have a server with an IP address (e.g., 12.34.56.78), but sharing this IP is impractical. A domain name provides a memorable and professional alternative.
Domain names are manages by domain name registrars, accredited companies that handle the reservation of internet domain names. For example, I registered huuthang.site through Joker.com (not sponsored) at a low annual cost.
When a user accesses huuthang.site, the browser performs the following steps:
- Checks its own DNS cache, computer's DNS cache, or OS' DNS cache.
- If not found, the OS sends a DNS query to the configured resolver (usually the network provider's DNS server or a specified one)
- The DNS resolver then performs a lookup, eventually reaching the domain name registrar to resolve the domain to its corresponding IP address.
DNS (Domain Name System) is the system that translates human-readable domain names (like
blog.huuthang.site) into IP addresses computers use to find each other, acting like a distributed phonebook that routes your request to the correct server so the internet actually knows where to send your traffic.
After registering the domain, you must configure DNS records so that DNS servers can resolve your domain to the correct IP address. Key DNS record types include:
- A record: Maps a hostname to an IPv4 address.
- AAAA record: Maps a hostname to an IPv6 address.
- CNAME record: Creates an alias to another domain.
- TXT record: Used for verification, SPF, DKIM, and other configuration.
For my setup, I created multiple A records for both the root domain (huuthang.site) and subdomains (blog.huuthang.site, portfolio.huuthang.site, etc.), all pointing to the same VPS IP address. This ensures that all subdomains resolve correctly.
I also used TXT records to:
- Verify ownership with Google Search Console to see how my site performs in Google Search (queries, clicks, impressions).
- Set up SPF and DMARC for email security.
| Record Type | Host/Name | Value (Example) | Purpose |
|---|---|---|---|
| A | @ (Root) | 12.34.56.78 | Points the main domain to the VPS. |
| A | blog | 12.34.56.78 | Points the blog subdomain to the same IP. |
| TXT | @ | google-site-verification=... | Verifies ownership for Google Search Console. |
| TXT | @ | v=spf1 mx ~all | Enhances email security and prevents spoofing. |
Note that subdomains do not automatically inherit the same configuration as the root domain. For example, blog.huuthang.site must be explicitly configured to point to the VPS IP.
Additionally, when accessing huuthang.site and being redirected to blog.huuthang.site, this is not handled by a CNAME record. Instead, it's a redirection managed by Nginx, which I'll cover in a future post.
Security Hardening Checklist
To anyone worried about the server being "exposed" at launch: you’re right. My logs already showed 15,000+ automated bot attacks within some days. Here is the essential checklist I used to lock the doors:
- Kill Passwords: Set PasswordAuthentication no. This makes brute-force attacks almost impossible; without a private SSH key, no one can get in.
- Disable Root Login: Set
PermitRootLoginno. Most bots target the root user; disabling it means they are attacking a door that doesn't exist. - Default Deny (UFW): Block everything by default. Only explicitly allow 22 (SSH), 80 (HTTP), and 443 (HTTPS).
- Auto-Ban (Fail2Ban): Set up automated banning to drop connections from IPs that show malicious patterns or repeated failures.
- The Whitelist: Always add your home IP to the
ignoreiplist. Security is only useful if it doesn't lock you out by mistake (×_×).
The Edge Layer: Cloudflare
After the initial setup where the blog was hosted directly on the VPS, I added a Cloudflare layer. The primary goals were to leverage their Global CDN for better performance and to utilize their edge servers for DDoS prevention.
The migration process was straightforward but required precise DNS handling. After adding the domain to the platform, Cloudflare scanned my existing records and automatically identified the A records. I then toggled the Proxy status for all my domain and subdomains - including blog., portfolio., dev., and ws. - to the Proxied (Orange Cloud) setting.

IP Addresses are crossed/hidden.
This toggle fundamentally changes how the internet sees my server. Instead of your browser connecting directly to my Contabo VPS IP, it connects to a Cloudflare edge server. Cloudflare then fetches the content from my VPS and delivers it to you. This masks my real origin IP from the public, making it much harder for attackers to target the server directly.
To finalize the handover, I updated the settings at my registrar, Joker.com, by replacing their default nameservers with Cloudflare's assigned pairs:
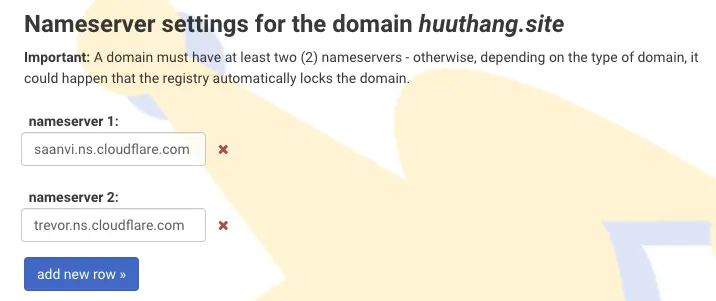
Now, when you type
blog.huuthang.siteinto your browser, the process works like this: your computer first asks Joker.com where the "phonebook" (DNS) for this domain is located. Joker.com points you to Cloudflare’s nameservers above. Cloudflare then looks at the records I set up. If a record is "Orange Cloud" (Proxied), Cloudflare gives you one of its own IP addresses to act as a shield. If a record is "Grey Cloud" (DNS Only), Cloudflare simply gives you the original content (e.g. IP address).
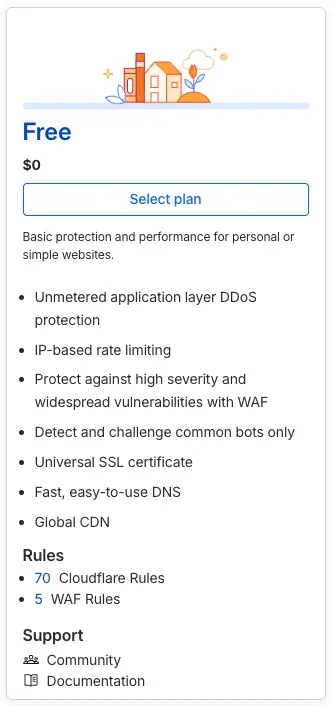
This layer is critical for both performance and long-term security. By utilizing Cloudflare’s Global CDN, static assets are cached closer to the user, which reduces the processing load on my VPS and speeds up page delivery.
On the security front, the Free tier provides unmetered application-layer DDoS protection and IP-based rate limiting.
Since I had previously configured Let's Encrypt on the VPS, I set the SSL/TLS encryption mode to Full. This maintains an encrypted connection for the entire journey: from the user to the Cloudflare edge, and from the edge back to my origin server.
TLS (Transport Layer Security) is the protocol that encrypts the data moving between a visitor's browser and my server, preventing anyone from "eavesdropping" on the traffic. Let's Encrypt acts as a free, automated Certificate Authority that issued the digital certificate needed to prove my server's identity and enable that secure HTTPS connection. I will cover the specific technical steps of the Let's Encrypt setup and how I configured the server to handle these certificates in much more detail in the next post.
Current Status: It’s Alive!
If you are reading this right now, it means the infrastructure described above is holding up. The bytes traveled from my Contabo VPS, through the A records I configured, and into your browser.
Coming Next
Even with a server as capable as this one, you don't just let the raw internet scream directly at your application. Behind the scenes of this very page, there is a silent sentinel - The Gate Keeper
In the next post, I’ll document the layer that sits between you and my application. It’s the piece that handles the high-speed handshakes, secures your connection, and orchestrates the traffic flow.
On the Move Again
A lot has changed since this post was first written. The Contabo VPS served me well, but even at its modest price point, paying a monthly bill for a personal blog felt increasingly hard to justify - especially when free alternatives exist. Around the same time, my huuthang.site domain expired, so I took the opportunity to switch to huuthangle.site (still registered through Joker.com).
Fly.io - A Promising Start
The first stop was Fly.io. Their free tier looked ideal on paper: Docker-native, always-on machines, native WebSocket support, and persistent volumes. I migrated all three services - the SvelteKit frontend, the Rust/Axum backend, and the WebSocket proxy - and it worked well for a while.
The catch? There is no official documentation guaranteeing that free tier. The machines were running, the bill was $0, but I had no formal promise it would stay that way. For a hobby project I can tolerate some risk, but the prospect of waking up to a surprise invoice larger than what Contabo was charging felt like the wrong kind of adventure.
The Oracle Jackpot
Cue Oracle Cloud Free Tier - and this is where the stack choice finally paid off.
Oracle offers two permanently free AMD micro instances (VM.Standard.E2.1.Micro): 1 OCPU, 1 GB RAM each. On paper that sounds laughably small. In practice, for a Svelte + Rust stack? It's almost a perfect fit. SvelteKit's production build is lean, and a compiled Rust binary has essentially no runtime overhead. The combination was made for exactly this kind of constrained environment.
There's also a theoretically superior option: VM.Standard.A1.Flex, an ARM instance with up to 4 OCPUs and 24 GB RAM - always free. I tried to claim it. It's essentially a lottery; the slots are almost always taken in any given region. I spun the wheel a few times and got nothing, so I settled for the AMD micro and moved on.
The A1.Flex slots do open up occasionally - it's worth checking back if you want that upgrade. For now, the E2.1.Micro is doing just fine.
The RAM Problem (and How the Pipeline Changed)
The single biggest challenge with a 1 GB machine is compilation. Rust is notorious for its memory appetite during builds - the backend alone (axum, sqlx, async-graphql, tokio) can consume several gigabytes at peak. On the first attempt to build on the VM, it simply froze. SSH stopped responding. I had to hard-reboot from the Oracle Cloud console.
The fix was to stop building on the VM entirely. The new CI/CD pipeline uses GitHub Container Registry (GHCR) as the middle layer - GitHub Actions builds the images on their own runners and pushes to GHCR, then the VM simply pulls and restarts.
| Step | Where it runs |
|---|---|
cargo build (Rust backend) |
GitHub Actions runner |
bun build (SvelteKit frontend) |
GitHub Actions runner |
docker compose pull |
Oracle VM |
docker compose up -d |
Oracle VM |
Other Adjustments
Beyond the build pipeline, a few smaller things needed fixing to adapt to the new environment:
- Swap space: Added 4 GB of swap to the VM. Not for compilation (that's gone), but as a safety net for Docker pulling large images and for general runtime stability.
- Firewall rule ordering: Oracle Cloud's Ubuntu image ships with a default
iptableschain that has a catch-allREJECTrule. Naively appendingACCEPTrules for ports 80 and 443 after theREJECTdoes nothing. The rules need to be inserted before it. - Media routing: The backend has no public domain on this setup - nginx is the only public-facing entry point. A dedicated
location /media/block in the nginx config proxies media requests directly to the Rust backend on an internal port, bypassing SvelteKit entirely. On a 1 GB machine, every unnecessary memory allocation counts. - Database migration: The SQLite database and media files were exported from Fly.io via
sftpandscp'd directly onto the Oracle VM.
Current Status
The blog is now running on an Oracle Cloud VM.Standard.E2.1.Micro instance, costing exactly $0/month. Oracle gives you two always-free AMD micros, so the WebSocket proxy lives on the second one alongside any other lightweight services. Cloudflare sits in front as before - though in DNS-only (grey cloud) mode now, since TLS is terminated directly on the VM by Certbot.
| Service | Hosting | Cost |
|---|---|---|
| Blog frontend (SvelteKit) | Oracle Cloud VM #1 | Free |
| Blog backend (Rust/Axum) | Oracle Cloud VM #1 | Free |
| Portfolio (React) | Cloudflare Pages | Free |
| WebSocket proxy | Oracle Cloud VM #2 | Free |
If an A1.Flex slot opens up, there's a meaningfully better free machine waiting. Until then - it works, it's fast, and the bill is still zero.
This post is in the series [ THE ARTIFACT MANIFEST ]


Table of contents
Join the discussion!

Nothing to preview yet. Start typing...